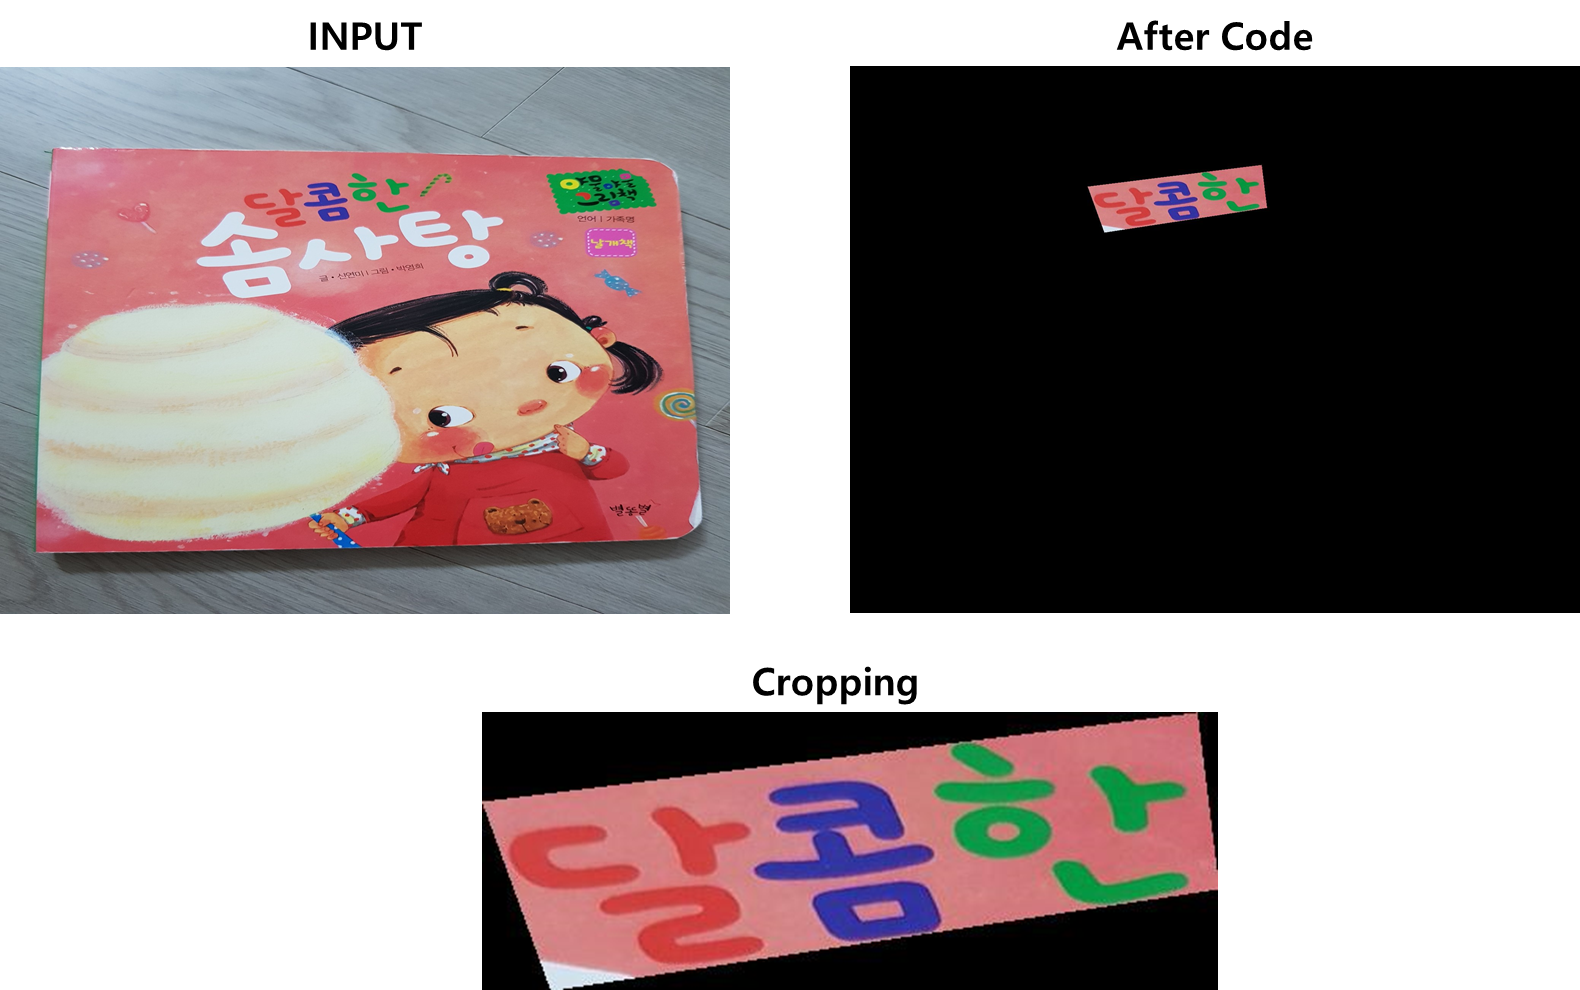
# FOR PNG shape
import numpy
from PIL import Image, ImageDraw

# read image as RGB and add alpha (transparency)
im = Image.open("crop.jpg").convert("RGBA")

# convert to numpy (for convenience)
imArray = numpy.asarray(im)

# create mask
polygon = [(444,203),(623,243),(691,177),(581,26),(482,42)]
maskIm = Image.new('L', (imArray.shape[1], imArray.shape[0]), 0)
ImageDraw.Draw(maskIm).polygon(polygon, outline=1, fill=1)
mask = numpy.array(maskIm)

# assemble new image (uint8: 0-255)
newImArray = numpy.empty(imArray.shape,dtype='uint8')

# colors (three first columns, RGB)
newImArray[:,:,:3] = imArray[:,:,:3]

# transparency (4th column)
newImArray[:,:,3] = mask*255

# back to Image from numpy
newIm = Image.fromarray(newImArray, "RGBA")
newIm.save("out.png")
FOR JPG SHAPE
import numpy
from PIL import Image, ImageDraw

# read image as RGB (without alpha)
img = Image.open("crop.jpg").convert("RGB")

# convert to numpy (for convenience)
img_array = numpy.asarray(img)

# create mask
polygon = [(444,203),(623,243),(691,177),(581,26),(482,42)]

# create new image ("1-bit pixels, black and white", (width, height), "default color")
mask_img = Image.new('1', (img_array.shape[1], img_array.shape[0]), 0)

ImageDraw.Draw(mask_img).polygon(polygon, outline=1, fill=1)
mask = numpy.array(mask_img)

# assemble new image (uint8: 0-255)
new_img_array = numpy.empty(img_array.shape, dtype='uint8')

# copy color values (RGB)
new_img_array[:,:,:3] = img_array[:,:,:3]

# filtering image by mask
new_img_array[:,:,0] = new_img_array[:,:,0] * mask
new_img_array[:,:,1] = new_img_array[:,:,1] * mask
new_img_array[:,:,2] = new_img_array[:,:,2] * mask

# back to Image from numpy
newIm = Image.fromarray(new_img_array, "RGB")
newIm.save("out.jpg")저 코드를 수행할 경우 오른쪽 After Code 이미지처럼 나머지 부분이 0값이 되는데, 나같은 경우엔 실제 크롭된 이미지가 필요하기 때문에 자를 영역의 Top-Left Points, Bottom-Right Points를 구해서 PIIL Image에 추가 crop적용해주었다.
# area is the tuple about ROI areas.
# area = (tl_x, tl_y, br_x, br_y)
cropped_img = cropped_img.crop(area)
Full Code
import os
from glob import glob
import cv2
from tqdm import tqdm
from PIL import Image, ImageDraw
import numpy as np
'''
이미지와 그에 대응되는 STR 데이터가 존재할 때,
각 이미지 별 gt txt가 존재하며, 각 gt txt는
"x1    y1    x2    y2    x3    y3    x4    y4    label"
다음과 같은 형태로 각 문자 영역 별 정보가 tab(\t)으로 구분되어 있다

이를 Roi별 이미지로 저장하고, 하나의 txt파일(valid.txt) 에 모든 정보를 다 적을 수 있도록 만든 코드.
'''
def crop_img_JPG(img, polygon, area):

    # create new image ("1-bit pixels, black and white", (width, height), "default color")
    maskIm = Image.new('1', (img.shape[1], img.shape[0]), 0)
    #maskIm = Image.new('1', (height, width), 0)
    ImageDraw.Draw(maskIm).polygon(polygon, outline = 1, fill = 1)
    mask = np.array(maskIm)

    # assemble new image (uint8: 0-255)
    cropped = np.empty(img.shape,dtype='uint8')

    # copy color values (RGB)
    cropped[:,:,:3] = img[:,:,:3]

    # filtering image by mask
    cropped[:,:,0] = cropped[:,:,0] * mask
    cropped[:,:,1] = cropped[:,:,1] * mask
    cropped[:,:,2] = cropped[:,:,2] * mask

    cropped_img = Image.fromarray(cropped, "RGB")

    cropped_img = cropped_img.crop(area)
    #import pdb; pdb.set_trace()

    return cropped_img

def coord_point(points):
    polygon = []
    for idx in range(0, len(points), 2):
        x_y = (points[idx], points[idx+1])
        polygon.append(x_y)

    return polygon

root = '[데이터 경로]/*/*.txt' #GT 텍스트 파일이 모여있는 경로
img_path = '[이미지 경로]'# 이미지 파일이 모여있는 경로
txt_lst = sorted(glob(root, recursive = True))

new_gts = './valid_label.txt'
txt = open(new_gts, 'w')
tokenizer = '\t'

for idx in tqdm(range(len(txt_lst))):#len(txt_lst)

    org_gt_file = open(txt_lst[idx],'r')
    bboxes = org_gt_file.readlines()

    for i, bbox in enumerate(bboxes):

        bbox_point = bbox.split(tokenizer)[:-1]
        bbox_point = [int(float(point)) for point in bbox_point]

        bbox_label = bbox.split(tokenizer)[-1].replace('\n','')

        tl_x = min(bbox_point[0::2])
        tl_y = min(bbox_point[1::2])
        br_x = max(bbox_point[0::2])
        br_y = max(bbox_point[1::2])
        area = (tl_x, tl_y, br_x, br_y)

        polygon = coord_point(bbox_point)

        org_img = txt_lst[idx].split('/')[-1][:-4]+'.jpg'
        img = Image.open(img_path+org_img).convert("RGB")

        cropped_img = crop_img_JPG(np.asarray(img), polygon, area)

        img_id = "%s-%d.jpg"%(txt_lst[idx].split('/')[-1][:-4],i)

        cropped_img.save('./images/'+img_id)
        sentence = 'images/'+str(img_id)+tokenizer+str(bbox_label)+'\n'

        txt.write(sentence)
txt.close()Polygon crop/clip using Python / PIL
The polygon points along with the uncut, original image are sent by client to the server. Is there a way that I can clip (crop) the original image along these points in Python server, and save the
stackoverflow.com
+) 참고자료
https://holypython.com/python-pil-tutorial/how-to-crop-images-with-python-pil/
How to crop images with Python (PIL): The Ultimate Guide | HolyPython.com
Advanced Python Projects ready to be mastered, provided by HolyPython. Gain confidence with just the most effective learning reinforcement methods.
holypython.com
# CV2 CROP
https://stackoverflow.com/questions/48301186/cropping-concave-polygon-from-image-using-opencv-python
'머신러닝 > Computer Vision' 카테고리의 다른 글
| [PIL] convert RGBA Numpy to PIL Image (TypeError: Cannot handle this data type: (1, 1, 4), <f4) (0) | 2022.01.24 |
|---|---|
| [PIL] 함수 모음 - 지속적으로 작성 진행 중 (0) | 2022.01.21 |
| [OpenCV] Histogram, Normalize (0) | 2021.11.09 |
| Tensor to image / numpy array to image / PIL image save (Save feature as image) (0) | 2021.10.29 |
| [Computer Vision 기초] 3. 현대 신경망(Convolution, Pooling) (0) | 2021.07.18 |
