※ 본 게시물에 사용된 내용은 대다수 <실전! 텐서플로2를 활용한 딥러닝 컴퓨터 비전>에서 사용된 자료이며, 일부 자료는 추가 수정한 부분도 존재합니다.
Computer Vision
컴퓨터 비전 : 디지털 이미지(영상)에서 정보를 자동으로 추출하는 것
= 컴퓨터에게 인간이 이해하는 방식, 그보다 더 나은 방식으로 픽셀 단위의 데이터를 이해하는 방법을 가르치는 것.
컴퓨터 비전의 주요 목적은 콘텐츠 인식: 이미지를 이해하는 것, 즉 픽셀로부터 유의미한 의미론적 정보(이미지 내 객체, 위치, 개수 등)을 추출하는 것.
자세한 컴퓨터 비전의 세부 분류는 다음과 같다.
- 객체 분류(Object Classification)
: 객체 분류(이미지 분류)라 불리며, 사전 정의된 집합의 이미지 전체에 적절한 label(or class)을 할당하는 작업

- 객체 식별(Object Recognition)
: 객체 식별(인스턴스 분류)라 불리며, 클래스의 특정 인스턴스를 인식하는 작업(클러스터링 작업)

- 객체 탐지 & 위치 추정(Object Detection & Object Localization)
: 이미지 내 특정 요소를 탐지, 특정 요소에 대한 클래스 유추, 위치 추정 후 경계박스(Bounding box)를 수행

- 객체 분할(Object Segmentation=Semantic Segmentation)
: 전체 이미지를 픽셀 단위로 클래스 분류, 모든 픽셀의 클래스를 분류(배경, 물체 클래스)
- 인스턴스 분할(Instance Segmentation)
: 전체 이미지를 픽셀 단위로 클래스 분류, 같은 클래스 단위라도 객체별로 구별

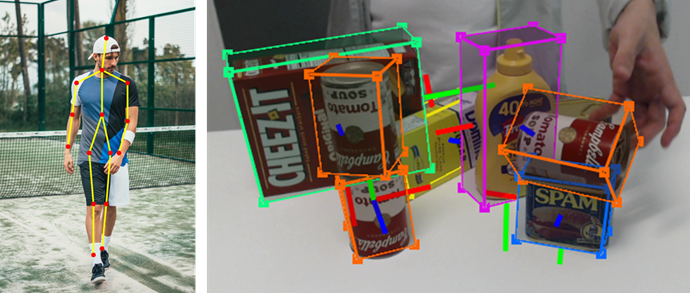
- 자세 추정(Pose Estimation)
: 고정된 객체의 경우, 3차원 공간에서 카메라를 기준으로 객체의 위치와 방향을 추정, 사람의 경우 사람의 자세 추정

- 동영상 분석 : 프레임단위로 분석해야 할 경우, 이미지 시퀀스를 고려.
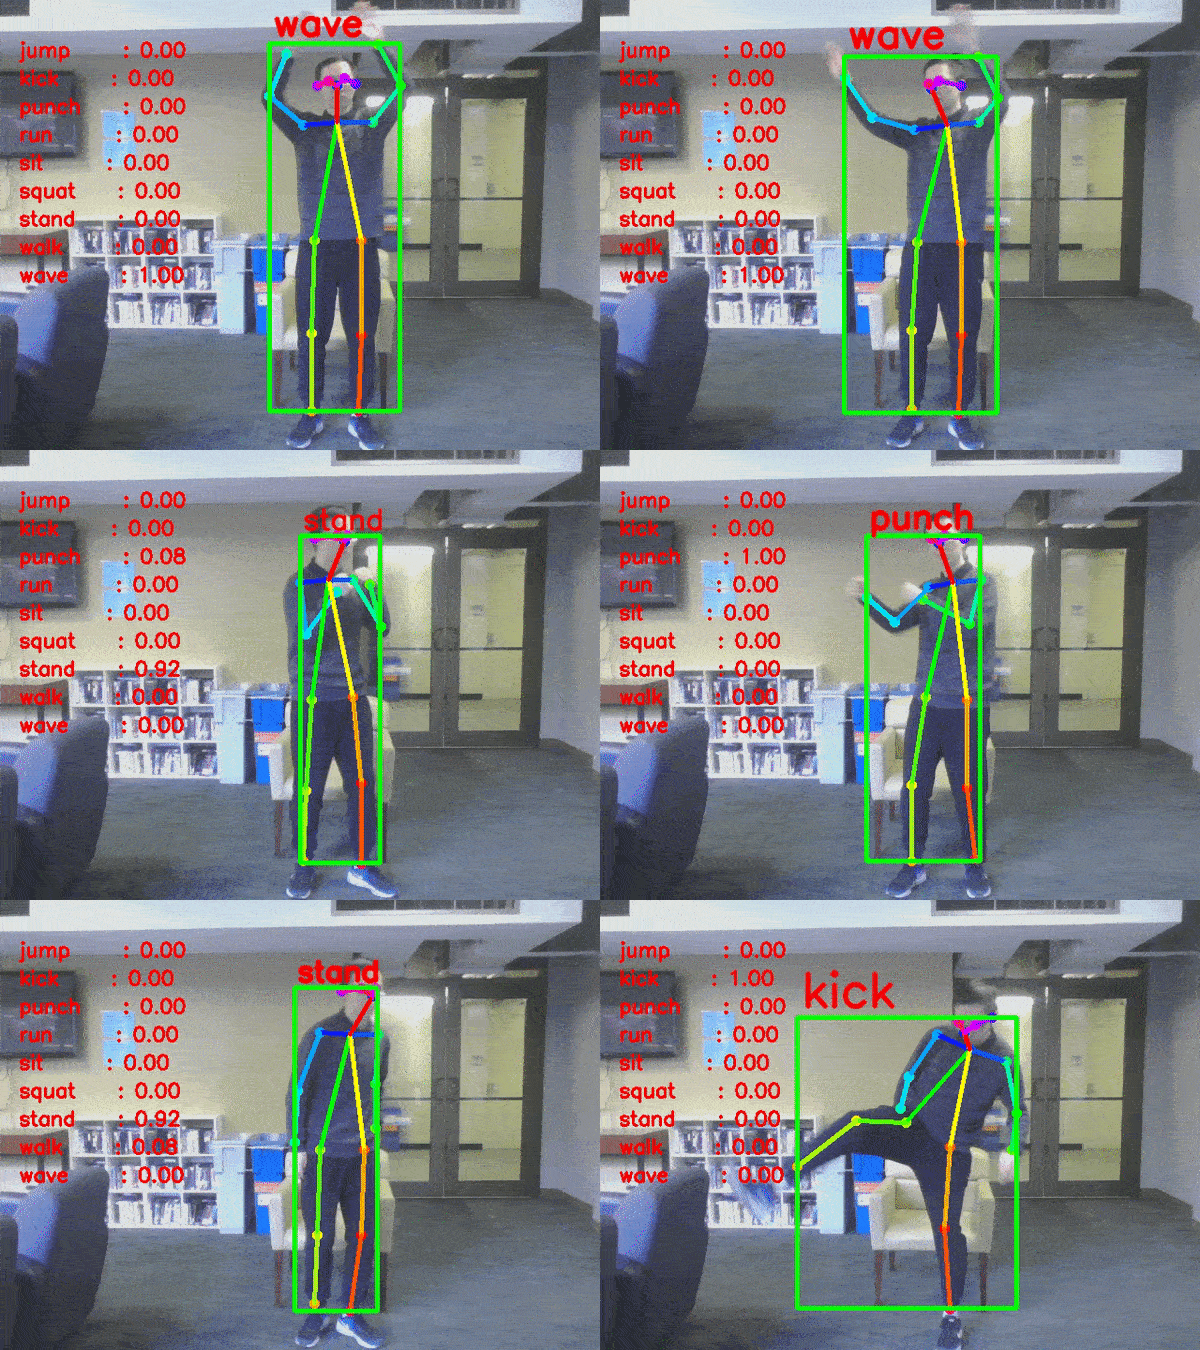
- 행동 인식(Activity Recognition)
: 행동 인식은 앞, 뒤 이미지 시퀀스를 모두 고려해야만 인식할 수 있는 것으로, 사전 정의된 집합 중 특정 행동을 인식하는 것을 의미한다.(수영하기, 춤추기, 요리하기 ...)

- 이미지 해상도 개선(Resolution Enhancing)
: 컴퓨터 비전 기술을 이용해 이미지 자체의 품질을 개선시킬 수 있다.

딥러닝 네트워크가 크게 발전되지 않았을 때는 사람이 직접 알고리즘을 설계(이전 포스팅 참고)하여 이미지 특징 추출을 할 수 있도록 수행하였고, 대표적인 라이브러리로 OpenCV가 있다.
+) OpenCV(Open Source Computer Vision)
- 실시간 이미지/영상 처리에 사용되는 오픈 소스 라이브러리
- Python, C++, Java, Windows, Linux, mac, ios, android 다양한 환경 지원
Home - OpenCV
OpenCV provides a real-time optimized Computer Vision library, tools, and hardware. It also supports model execution for Machine Learning (ML) and Artificial Intelligence (AI).
opencv.org
설치방법
pip install opencv-python
Neural Network(신경망)
본 포스팅은 CV에 관련된 포스팅인만큼 뉴런, 퍼셉트론, weight, activation function같은 기초 개념은 알고 있다는 전제 하에 작성하도록 한다. 자세한 정보를 얻고 싶으면 이전 포스팅을 참고해도 좋다.
개념의 경우, 이전 포스팅을 참고하고 간단한 예제를 통해 실제 뉴런과 네트워크의 동작방식, 구현방법을 참고해보자.
+) 본 책의 경우 Chapter 1을 구성하는 모든 내용이 하나의 파일(ipynb기준)을 따라가는 형태로 구성되어 있다. 그러므로 설명과정에서 파일의 소제목을 표기하였다.
yellowjs0304/tf_computer_vision
《실전! 텐서플로 2를 활용한 딥러닝 컴퓨터 비전》 예제 코드_개인스터디용. Contribute to yellowjs0304/tf_computer_vision development by creating an account on GitHub.
github.com
[At the Beginning: the Neuron(뉴런 예제)]
필요한 라이브러리 import
# !pip install numpy    # Numpy 라이브러리가 이미 있을 경우 그대로 진행/ 만약 없을 경우 Pip install 커맨드로 설치 요망
import numpy as np      # 행렬곱 연산을 수행하기 때문에 Numpy array 사용. numpy 임포트.
np.random.seed(42) # random.seed() 함수는 난수 생성에 필요한 시드를 설정np.random.seed에 대한 설명은 다음 포스팅을 참고하자.
본격적으로 다음 그림과 같은 뉴런 네트워크를 만들어보자.

class Neuron(object):
    """
    입력 벡터를 처리하여 activation function에 따라서 반환하는 인공 뉴런(Network가 아님)
    Args :
        num_inputs(int): 입력 벡터 사이즈
        actviation_function(callable): Neuron 정의시 사용되는 활성화 함수
    Attributes :
        W(ndarray):각 입력 데이터의 Weight 값
        b(float): bias값 (Weight sum에 더해짐)
        activation_function (callable): 출력물 계산때 사용되는 activation function
    """

    def __init__(self, num_inputs, activation_function):
        super().__init__()

        # Weight vector랑 bias값을 무작위로 초기화(ex. -1~1사이의 단순한 분포)
        self.W = np.random.uniform(size=num_inputs, low=-1., high=1.)
        self.b = np.random.uniform(size=1, low=-1., high=1.)

        self.activation_function = activation_function

    def forward(self, x):
        """
        뉴런의 Forward 함수
        Args:
            x (ndarray): (1, num_inputs) 크기의 input vector
        Returns:
            activation (ndarray): (1, layer_size)`크기의 activation function.
        """
        z = np.dot(x, self.W) + self.b
        # np.dot : 두 array의 dot product함수
        return self.activation_function(z)
뉴런 클래스를 정의한 후, 본격적으로 뉴런이 동작하는 함수를 작성한다.
# 퍼셉트론의 Input Size:
input_size = 3

# Activation function==>Step function (returns 0 if y <= 0, or 1 if y > 0):
step_function = lambda y: 0 if y <= 0 else 1

# 뉴런클래스에 데이터 입력 후, Perceptron 데이터 받아오기:
perceptron = Neuron(num_inputs=input_size, activation_function=step_function)
print("Perceptron's random weights = {} , and random bias = {}".format(perceptron.W, perceptron.b))
뉴런에 입력으로 줄 3개의 랜덤 입력 벡터를 무작위로 생성(shape:(1,3))
x = np.random.rand(input_size).reshape(1, input_size)
print("Input vector : {}".format(x))
Perceptron에 Input데이터를 공급하고, 관련 Activation 을 표시한다.
y = perceptron.forward(x)
print("Perceptron's output value given `x` : {}".format(y))
간단한 뉴런 구조 및 동작을 수행해 봤으므로, 이제 뉴런을 계층화한 네트워크를 구성해보자.
[Layering Neurons Together]
일반적으로 신경망은 계층, 즉 동일한 입력을 받고 동일한 연산을 수행하는 뉴런들의 집합으로 구성된다.
다음 그림에 맞는 클래스를 선언해보자.

class FullyConnectedLayer(object):
    """간단한 FC 신경망
    Args:
        num_inputs (int): 입력 벡터 크기 / 입력 값의 개수
        layer_size (int): 출력 벡터 크기 / 뉴런의 개수
        activation_function (callable): 이 계층에 사용할 Activation function
    Attributes:
        W (ndarray): 각 입력값에 대응되는 Weight
        b (ndarray): Weight sum(가중합)에 더해질 Bias 값
        size (int): 레이어 크기/뉴런 개수
        activation_function (callable): 뉴런에 적용할 Activation Function
        x (ndarray): 역전파를 위해 마지막에 제공되는 입력 벡터
        y (ndarray): 역전파로 사용되기 위해 x에 대응되는 출력값
        derivated_activation_function (callable): 역전파에 해당되는 파생함수
        dL_dW (ndarray): 가중치 W에 대한 Loss미분값
        dL_db (ndarray): 편향 b에 대한 Loss미분값
    """

    def __init__(self, num_inputs, layer_size, activation_function, derivated_activation_function=None):
        super().__init__()

        # 랜덤하게 Weight와 Bias를 초기화(정규 분포를 사용):
        self.W = np.random.standard_normal((num_inputs, layer_size))
        self.b = np.random.standard_normal(layer_size)
        self.size = layer_size

        self.activation_function = activation_function
        self.derivated_activation_function = derivated_activation_function
        self.x, self.y = None, None
        self.dL_dW, self.dL_db = None, None

    def forward(self, x):
        """
        layer에 대해서 Input vector에 대한 Forward함수 / 출력값은 Activation Function 적용된 값.
        Args:
            x (ndarray): (batch_size, num_inputs)사이즈의 입력 벡터
        Returns:
            activation (ndarray): (batch_size, layer_size)사이즈의 Activation vector
        """
        z = np.dot(x, self.W) + self.b
        self.y = self.activation_function(z)
        self.x = x  #역전파를 위해 입력, 출력물 저장
        return self.y

    def backward(self, dL_dy):
        """
        Loss를 역전파, 모든 미분을 계산하고 layer의 매개변수와 관련해 저장, backpropagation을 위해 Loss 반환

        Args:
            dL_dy (ndarray): 레이어 출력에 대한 Loss 미분 (dL/dy = l'_{k+1}).
        Returns:
            dL_dx (ndarray): 레이어 입력에 대한 Loss 미분 (dL/dx).
        """
        dy_dz = self.derivated_activation_function(self.y)  # = f'
        dL_dz = (dL_dy * dy_dz) # dL/dz = dL/dy * dy/dz = l'_{k+1} * f'
        dz_dw = self.x.T
        dz_dx = self.W.T
        dz_db = np.ones(dL_dy.shape[0]) # dz/db = d(W.x + b)/db = 0 + db/db = "ones"-vector

        # 최적화를 위해 각 lyaer의 매개변수와 관련된 미분값을 계산하고 저장함:
        self.dL_dW = np.dot(dz_dw, dL_dz)
        self.dL_db = np.dot(dz_db, dL_dz)

        # 입력에 대한 미분값을 계산하여 직전 레이어(`dL_dy`)로 전달:
        dL_dx = np.dot(dL_dz, dz_dx)
        return dL_dx

    def optimize(self, epsilon):
        """
        저장된 미분값을 사용해 레이어 매개변수를 최적화하는 과정
        Args:
            epsilon (float): 학습률.
        """
        self.W -= epsilon * self.dL_dW
        self.b -= epsilon * self.dL_db
코드가 간단하기 때문에 각 클래스를 구성하는 변수를 init 함수로, 나머지 forward와 backward, optimize 함수를 차례로 진행한다.
input_size    = 2
num_neurons   = 3
relu_function = lambda y: np.maximum(y, 0)

layer = FullyConnectedLayer(num_inputs=input_size, layer_size=num_neurons, activation_function=relu_function)input size, neuron개수, relu function까지 직접 정의 후, FC layer를 선언한다.
입력에 들어갈 벡터를 랜덤하게 정의한다.
x1 = np.random.uniform(-1, 1, 2).reshape(1, 2)
print("Input vector #1: {}".format(x1))

x2 = np.random.uniform(-1, 1, 2).reshape(1, 2)
print("Input vector #2: {}".format(x2))

이제 앞서 정의한 레이어를 사용해서 Input Value를 1) Layer1, Layer2 차례대로 진행하는 방법과 2) 두 데이터를 한번에 묶어 처리하는 방법 두 가지를 사용해본다.
1) Layer1, Layer2 차례대로 진행하는 방법
y1 = layer.forward(x1)
print("Layer's output value given `x1` : {}".format(y1))

y2 = layer.forward(x2)
print("Layer's output value given `x2` : {}".format(y2))

2) 두 데이터를 한번에 묶어 처리하는 방법
x12 = np.concatenate((x1, x2))  # input vectors를(2, 2)`로 연결
y12 = layer.forward(x12)
print("Layer's output value given `[x1, x2]` :\n{}".format(y12))
결과물을 보면 이전에 따로 실행됐던 결과물과 동일한 값으로 구성된 레이어가 등장하는 것을 볼 수 있다.
[Implementing a Complete Neural Network]
이제 정의된 뉴런 기반의 FC네트워크는 단순히 데이터를 연산하는 과정을 정의했다면, 본격적으로 정의된 layer를 여러 겹으로 구성하는 Classificaiton Network를 구현해보자. 이 예제에서는 Gradient Descent를 적용하여 실제 올바른 학습을 진행해 볼 수 있고, 이때 필요한 Loss함수도(L2 loss OR Cross Entropy loss) 같이 구현해본다.
학습에 사용할 Activation Function으로 Sigmoid함수를 직접 구현해본다.
def sigmoid(x):             # sigmoid function
    y = 1 / (1 + np.exp(-x))
    return y


def derivated_sigmoid(y):   # sigmoid derivative function(Sigmoid의 미분함수(도함수))
return y * (1 - y)이어서, L2 , cross-entropy loss함수를 정의한다.
+) L1 loss : 실제-예측값 간 차이의 절댓값 / L2 loss(=Mean Squared Error): 오차의 제곱합 / Cross Entropy : 분류 모델에 대한 손실 함수
def loss_L2(pred, target):             # L2 loss function
    return np.sum(np.square(pred - target)) / pred.shape[0] # opt. we divide by the batch size


def derivated_loss_L2(pred, target):   # L2 derivative function(L2 loss의 도함수)
    return 2 * (pred - target)


def binary_cross_entropy(pred, target):            # cross-entropy loss function
    return -np.mean(np.multiply(np.log(pred), target) + np.multiply(np.log(1 - pred), (1 - target)))


def derivated_binary_cross_entropy(pred, target):  # cross-entropy derivative function
    return (pred - target) / (pred * (1 - pred))
이제 본격적인 네트워크를 정의해보자. 네트워크 초기화를 위한 Init함수와 forward함수, backward, predict, optimize 등 필수적인 함수를 정의하고, train 함수를 차례로 주석에 따라가면 쉽게 이해할 수 있을것이다.
class SimpleNetwork(object):
    """간단한 완전연결신경망 예제
    Args:
        num_inputs (int): The input vector size / number of input values.
        num_outputs (int): The output vector size.
        hidden_layers_sizes (list): Network에 더해지는 각각의 hidden layer의 사이즈를 담은 리스트
        activation_function (callable): 모든 레이어에 대한 Activation function
        derivated_activation_function (callable): 미분된 activation function
        loss_function (callable): 네트워크 학습을 위한 Loss함수
        derivated_loss_function (callable): 역전파를 위해 미분된 Loss function
    Attributes:
        layers (list): 네트워크를 구성하는 레이어 리스트.
        loss_function (callable): 네트워크 학습을 위한 Loss 함수
        derivated_loss_function (callable): 역전파를 위해 미분된 loss함수
    """

    def __init__(self, num_inputs, num_outputs, hidden_layers_sizes=(64, 32),
                 activation_function=sigmoid, derivated_activation_function=derivated_sigmoid,
                 loss_function=loss_L2, derivated_loss_function=derivated_loss_L2):
        super().__init__()
        # 제공된 인수에 따라 네트워크 구성
        layer_sizes = [num_inputs, *hidden_layers_sizes, num_outputs]# 레이어 사이즈 : [입력 크기, hidden 레이어 사이즈, 출력 크기]

        self.layers = [
            FullyConnectedLayer(layer_sizes[i], layer_sizes[i + 1],
                                activation_function, derivated_activation_function)
            for i in range(len(layer_sizes) - 1)]
        # 레이어의 개수만큼 FClayer를 여러개 겹치게끔 구성

        self.loss_function = loss_function
        self.derivated_loss_function = derivated_loss_function

    def forward(self, x):
        """
        Input Vector가 Layer를 지나는 Forward함수
        Args:
            x (ndarray):(batch_size, num_inputs)` 사이즈의 Input Vector
        Returns:
            activation (ndarray): (batch_size, layer_size) 사이즈의 Activation Function
        """
        for layer in self.layers:
            x = layer.forward(x)# 입력데이터를 layer에 입력, 출력물 받기
        return x

    def predict(self, x):
        """
        input x에 대하여 계산후, 가장 큰 index를 결과물을 산출
        Args:
            x (ndarray): (1, num_inputs) 크기의 input size
        Returns:
            best_class (int): 예측 클래스 아이디
        """
        estimations = self.forward(x)# 입력 데이터(x)를 제공 후, output vector를 estimation으로 받고,
        best_class = np.argmax(estimations)# 그 중 가장 큰 값을 최종 예측 클래스로 산출
        return best_class

    def backward(self, dL_dy):
        """
        Network에서 Loss를 역전파하는 과정 (Forward 함수 다음에 수행되어야 함)
        Args:
            dL_dy (ndarray): Network의 output(y)에 대한 미분값
        Returns:
            dL_dx (ndarray): Network의 input(x)에 대한 미분값
        """
        for layer in reversed(self.layers): #
            dL_dy = layer.backward(dL_dy) # 역전파시 거꾸로
        return dL_dy

    def optimize(self, epsilon):
        """
        저장해둔 Gradient를 토대로 네트워크 최적화(backward 함수 다음에 수행되어야 함)

        Args:
            epsilon (float): The learning rate. 학습률
        """
        for layer in self.layers: # 순서는 상관 X
            layer.optimize(epsilon)

    def evaluate_accuracy(self, X_val, y_val):
        """
        데이터셋과 대응되는 정답 Label을 제공후, 현재 네트워크의 정확도를 측정
        Given a dataset and its ground-truth labels, evaluate the current accuracy of the network.
        Args:
            X_val (ndarray): 네트워크에 입력할 검증용 데이터
            y_val (ndarray): 검증용 데이터에 대응되는 정답
        Returns:
            accuracy (float): 네트워크 정확도(정답 데이터셋 개수/전체 데이터셋 개수)
        """
        num_corrects = 0
        for i in range(len(X_val)):
            pred_class = self.predict(X_val[i])
            if pred_class == y_val[i]:
                num_corrects += 1
        return num_corrects / len(X_val)

    def train(self, X_train, y_train, X_val=None, y_val=None,
              batch_size=32, num_epochs=5, learning_rate=1e-3, print_frequency=20):
        """
        데이터셋, 정답 라벨 제공, 현 네트워크에 대한 정확도 측정
        Args:
            X_train (ndarray): The input training dataset.
            y_train (ndarray): The corresponding ground-truth training dataset.
            X_val (ndarray): The input validation dataset.
            y_val (ndarray): The corresponding ground-truth validation dataset.
            batch_size (int): The mini-batch size.학습 때 사용하는 mini-batch 사이즈
            num_epochs (int): The number of training epochs i.e. iterations over the whole dataset. Epoch수
            learning_rate (float): The learning rate to scale the derivatives.
            print_frequency (int): Frequency to print metrics (in epochs).
        Returns:
            losses (list): The list of training losses for each epoch.
            accuracies (list): The list of validation accuracy values for each epoch.
        """
        num_batches_per_epoch = len(X_train) // batch_size # train데이터에 대한 batch size측정
        do_validation = X_val is not None and y_val is not None # 검증단계 여부를 결정하는 변수
        losses, accuracies = [], []
        for i in range(num_epochs): # for each training epoch 전체 Epoch 횟수만큼 반복
            epoch_loss = 0
            for b in range(num_batches_per_epoch):  # for each batch composing the dataset 데이터셋을 구성하는 각 batch마다
                # Get batch:
                batch_index_begin = b * batch_size  # batch index의 시작 지점
                batch_index_end = batch_index_begin + batch_size # batch index의 끝 지점
                x = X_train[batch_index_begin: batch_index_end] # Train 데이터
                targets = y_train[batch_index_begin: batch_index_end] # targets(정답 데이터)
                # Optimize on batch:
                predictions = y = self.forward(x)  # 입력 데이터, Network에 forward한 후 결과값 받아오기
                L = self.loss_function(predictions, targets)  # 예측한 결과물에 따라 Loss 계산
                dL_dy = self.derivated_loss_function(predictions, targets)  # Loss 미분
                self.backward(dL_dy)  # 네트워크 역전파 진행
                self.optimize(learning_rate)  # optimization of the NN 최적화 진행
                epoch_loss += L

            # Logging training loss and validation accuracy, to follow the training:
            # 매순간 Traning을 진행하면서 Loss와 Accuracy 출력
            epoch_loss /= num_batches_per_epoch
            losses.append(epoch_loss)
            if do_validation:
                accuracy = self.evaluate_accuracy(X_val, y_val)
                accuracies.append(accuracy)
            else:
                accuracy = np.NaN
            if i % print_frequency == 0 or i == (num_epochs - 1):
                print("Epoch {:4d}: training loss = {:.6f} | val accuracy = {:.2f}%".format(
                    i, epoch_loss, accuracy * 100))
        return losses, accuracies
[Applying our Network to Classification]
앞서 정의한 네트워크를 토대로 MNIST 손글씨 데이터를 사용해 실제 학습, 테스트를 진행해보자.

여기서는 MNIST 데이터셋 로딩과정을 위해 미리 정의된 mnist 모듈(상단 Github에서 ./mnist 폴더를 참고)을 사용한다.
%matplotlib inline
# !pip install matplotlib  # Matplotlib 라이브러리가 이미 있을 경우 그대로 진행/ 만약 없을 경우 Pip install 커맨드로 설치 요망
import matplotlib          # 결과와 데이터 확인을 위한 시각화 함수
import matplotlib.pyplot as plt
import mnist

np.random.seed(42) # random.seed() 함수는 난수 생성에 필요한 시드를 설정
MNIST 데이터를 train, test로 나눠준다.
X_train, y_train = mnist.train_images(), mnist.train_labels() # Mnist Train 데이터의 이미지, 라벨 로딩
X_test,  y_test  = mnist.test_images(), mnist.test_labels() # Mnist Test 데이터의 이미지, 라벨 로딩
num_classes = 10    # 클래스를 0 ~ 9로 분류
실제 이미지 데이터의 사이즈를 확인해보면 다음과 같다.
형식 : (이미지 개수,가로 길이, 세로길이)
Train : 6만개 / Test : 1만개
이미지 형식 : 28x28
print(X_train.shape) #(60000, 28, 28)
print(X_test.shape) #(10000, 28, 28)
실제로 matplotlib로 데이터를 확인해보면 다음과 같다.
img_idx = np.random.randint(0, X_test.shape[0])
plt.imshow(X_test[img_idx], cmap=matplotlib.cm.binary)
plt.axis("off")
plt.show()
>>> print(y_test[img_idx])
1실제로 이미지와 정답 클래스 맵핑이 잘 되어 있는것을 확인할 수 있다.
이제, 데이터 확인을 마쳤으므로 실제 데이터 입력을 위한 전처리 단계가 필요하다.
우리가 설계한 모델은 Flatten 모델이므로 1차원 벡터를 입력받기 때문에 x, y형태의 2D 벡터를 1D형태로 바꿔줘야 한다. ==> (28x28) = (1, 784) 형태로 변경.
따라서, reshape함수를 사용해 1D형태로 변경해주자.
X_train, X_test = X_train.reshape(-1, 28 * 28), X_test.reshape(-1, 28 * 28)사이즈만 변경해야 할게 아니라, 각 데이터를 구성하는 픽셀값도 확인해야 한다.
>>> print("Pixel values between {} and {}".format(X_train.min(), X_train.max()))
Pixel values between 0 and 2550~255로 구성된 8bit형태의 일반적인 정수 값 이미지이다. 그러나, 우리가 설정한 지수함수 바탕의 Sigmoid에 대입하면 nan("숫자가 아님")을 반환할 수 있으며, 이는 오버플로우를 양상할 수 있기 때문에 정규화해주는 것이 일반적이다.
즉, 기존 값을 0~1로 조정해주자.
또한, 부가적으로 기존의 라벨을 loss계산을 위해 one-hot encoding화 해주자.
X_train, X_test = X_train / 255., X_test / 255.

>>> print("Normalized pixel values between {} and {}".format(X_train.min(), X_train.max()))
Normalized pixel values between 0.0 and 1.0


y_train = np.eye(num_classes)[y_train] # One-hot Encoding Labeling
# ex) 4 = [0, 0, 0, 0, 1, 0, 0, 0, 0, 0]
이제 본격적인 Classification Model을 선언하기 위해, 앞에서 정의한 SimpleNetwork를 MNIST 데이터에 맞는 인수를 넣어 구성한다.
SimpleNetwork(입력: MNIST train data의 규격, 출력 : 실제 0~9까지의 클래스 개수, hidden layer의 vector 개수: (64,32)
mnist_classifier = SimpleNetwork(num_inputs=X_train.shape[1], num_outputs=num_classes, hidden_layers_sizes=[64, 32])mnist classification model을 선언하고, 학습되지 않은 모델이 실제로 동작하는지 테스트해보자.
predictions = mnist_classifier.forward(X_train)                         # forward pass
loss_untrained = mnist_classifier.loss_function(predictions, y_train)   # loss computation

accuracy_untrained = mnist_classifier.evaluate_accuracy(X_test, y_test)  # Accuracy
print("Untrained : training loss = {:.6f} | val accuracy = {:.2f}%".format(
    loss_untrained, accuracy_untrained * 100))
물론 성능은 학습되지 않은 모델이기 때문에 저조하게 나왔다. 이제 본격적으로 학습을 진행하자.
Train절차를 진행한다.
losses, accuracies = mnist_classifier.train(X_train, y_train, X_test, y_test,
                                            batch_size=30, num_epochs=500)
# note: Reduce the batch size and/or number of epochs if your computer can't
#       handle the computations / takes too long.
#       Remember, numpy also uses the CPU, not GPUs as modern Deep Learning
#       libraries do, hence the lack of computational performance here.
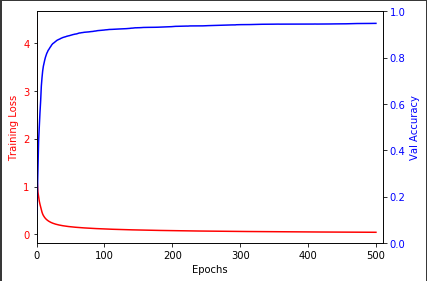
실제 Loss와 Accuracy를 시각화 하여 그래프로 보면 다음과 같다.
losses, accuracies = [loss_untrained] + losses, [accuracy_untrained] + accuracies
fig, ax_loss = plt.subplots()

color = 'red'
ax_loss.set_xlim([0, 510])
ax_loss.set_xlabel('Epochs')
ax_loss.set_ylabel('Training Loss', color=color)
ax_loss.plot(losses, color=color)
ax_loss.tick_params(axis='y', labelcolor=color)

ax_acc = ax_loss.twinx()  # instantiate a second axes that shares the same x-axis
color = 'blue'
ax_acc.set_xlim([0, 510])
ax_acc.set_ylim([0, 1])
ax_acc.set_ylabel('Val Accuracy', color=color)
ax_acc.plot(accuracies, color=color)
ax_acc.tick_params(axis='y', labelcolor=color)

fig.tight_layout()
plt.show()
마지막으로 테스트 이미지 하나를 뽑아서 성능을 테스트해보자.
# We use `np.expand_dims(x, 0)` to simulate a batch (transforming the image shape
# from (784,) to (1, 784)):
predicted_class = mnist_classifier.predict(np.expand_dims(X_test[img_idx], 0))
print('Predicted class: {}; Correct class: {}'.format(predicted_class, y_test[img_idx]))
지금까지는 주요 뉴런의 개념과 간단한 뉴런네트워크의 동작 방식을 확인하기 위해 직접 모든것을 구현해봤다.
본격적으로 다음 챕터에서는 Tensorflow와 Keras를 적극응용하겠다.
'머신러닝 > Computer Vision' 카테고리의 다른 글
| [OpenCV] Histogram, Normalize (0) | 2021.11.09 |
|---|---|
| Tensor to image / numpy array to image / PIL image save (Save feature as image) (0) | 2021.10.29 |
| [Computer Vision 기초] 3. 현대 신경망(Convolution, Pooling) (0) | 2021.07.18 |
| [Computer Vision 기초] 2. 텐서플로 기초와 모델 훈련 (0) | 2021.07.14 |
| [Computer Vision 기초] 0.Introduction (0) | 2021.06.28 |
